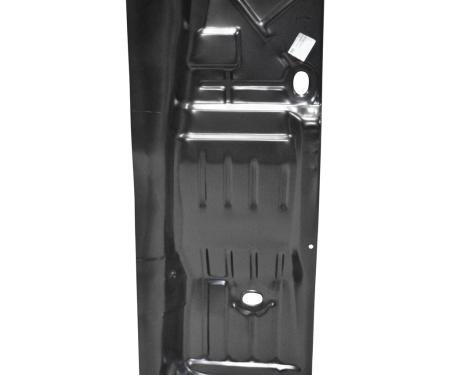
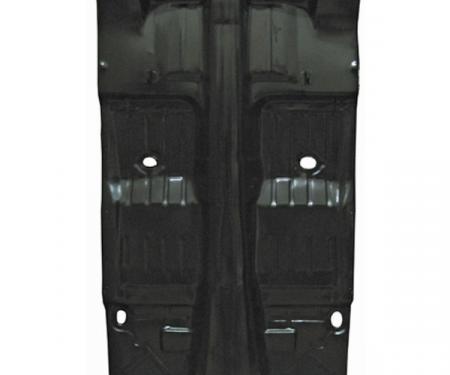
Complete left-front floor panel engineered for 1968–1974 Chevy II / Nova that replaces corroded or damaged flooring while restoring structural integrity and proper seat belt mounting. This unit includes the integrated seat belt bracket and the 1/2 center hump area for accurate alignment with the factory center tunnel. Designed for restoration and replacement projects, it provides durable, corrosion-resistant protection, correct OEM-style contours for a direct-fit installation, and a solid mounting point to preserve occupant safety.
Features:
- Fits 1968–1974 Chevy II / Nova — left front floor area
- Includes integrated seat belt bracket and 1/2 center hump area for correct alignment
- Formed from heavy-gauge steel with OEM-style contours for a near-direct fit
- Restores structural rigidity, prevents rust spread, and secures seat belt anchorage
- Supplies a corrosion-resistant surface ready for seam sealer, primer and paint
- Ideal for restorations or repair jobs where factory fit and safety are priorities
Installation / Application:
- Difficulty: 3/5
- Estimated time: 4-6 hours (varies by skill level and vehicle condition)
Instructions:
- Prepare vehicle: disconnect battery, remove seats, carpet, trim and any components obstructing the left front floor area.
- Assess and mark: inspect surrounding metal for rust; mark the existing floor panel where cuts will be made, keeping reference points for alignment.
- Remove old panel: cut out the damaged floor, removing spot welds and cleaning mating surfaces back to clean metal.
- Test fit new panel: position the replacement left front floor in place, checking fit of the seat belt bracket and 1/2 center hump against the tunnel and adjacent panels.
- Trim and adjust: trim the new panel as needed for a tight fit; use hammer/dolly to shape seams to match factory contours.
- Tack weld: clamp the panel in place and tack weld at multiple points to maintain alignment, then fully weld along seams using short welds to minimize warpage.
- Finish welds and grind: complete welding, grind welds flush where needed, and dress edges for a smooth transition.
- Protect and seal: apply rust-inhibiting primer to exposed metal, seam sealer to all joints, then prime and paint or undercoat as required.
- Reinstall interior: reinstall insulation, carpet, trim, and seats; torque seat belt fasteners to manufacturer spec and check bracket alignment and belt operation.
- Final inspection: verify weld integrity, sealing, and fitment; ensure no interference with seat operation or interior components.
About Redline Restomotive
Redline Restomotive® has established itself as a premier brand in the world of classic car restoration, providing enthusiasts with high-quality parts that meet the exacting standards of original manufacturer specifications. Dedicated to the preservation of American automotive history, Redline Restomotive® combines advanced manufacturing techniques with an in-depth understanding of vintage vehicles. The result is a range of products that seamlessly blend into the design and function of classic cars, giving restorers and collectors the assurance that each part reflects the era’s style, quality, and performance.
Crafted for both durability and aesthetic accuracy, Redline Restomotive® parts are ideal for those who value authenticity in their restoration projects. Whether restoring a car for display, personal enjoyment, or roadworthiness, customers rely on Redline Restomotive® for parts that not only fit perfectly but also contribute to the overall integrity and longevity of the vehicle. Each item is carefully engineered to replicate the fit, finish, and functionality of original components, making Redline Restomotive® a trusted name in restoration circles.
The extensive product catalog from Redline Restomotive® covers a wide variety of categories, allowing classic car owners to source everything from essential mechanical parts to subtle interior details. This comprehensive approach enables a cohesive restoration experience, where customers can confidently maintain both the exterior and interior authenticity of their vehicles. With Redline Restomotive®, every detail matters, providing the perfect balance between innovation and tradition for classic car preservation.
For more information or to explore their product offerings, you can visit retailers such as Muscle Cars & Classics, which feature a comprehensive selection of Redline Restomotive® products.

Vehicle Fitment:
The Vehicle Fitment Guide is to be used as a general reference. The data has been provided by our suppliers and manufacturers and may contain errors or incorrect data. Always refer to a professional to verify correct fitment for your vehicle.
| Make |
Model |
Years |
| Buick |
Apollo |
1973 - 1975 |
| Buick |
Skylark |
1976 |
| Chevrolet |
Chevy II |
1968 |
| Chevrolet |
Nova |
1969 - 1976 |
| Oldsmobile |
Omega |
1973 - 1976 |
| Pontiac |
Acadian |
1976 |
| Pontiac |
Ventura |
1971 - 1976 |